[小背包縫製簡易說明]
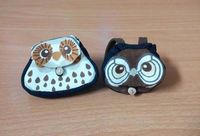
拍完才想到我的手機畫質超渣,黑色部分幾乎糊成一團,完全沒有參考性
拍完才想到我的手機畫質超渣,黑色部分幾乎糊成一團,完全沒有參考性
首先找個花色大小適當的布
然後留個適當的縫份把想做成包的部分剪下來
依照圖案形狀畫出差不多大小的版型
背帶用的是麂皮繩,因為不好鑿洞所以做成固定長度(大概6~7公分左右)
版型差不多就是這樣

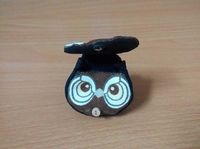
首先先把背帶縫上去
然後過程照片糊成一團沒辦法用,總之就是縫成這個樣子,包包背部+蓋子的部分就差不多了
縫的時候要留翻面的部分&弧形要剪牙口
比對一下繩結長度,把扣子縫上
最後就是把兩片縫起來
感謝說明!這樣我終於有機會縫比較正常的小背包了!
哇哇好厲害!水夏手超巧!
好可愛,感謝教學
包包超可愛的!感謝教學!
感謝教學
試了一下大約4公分小包也可以給醜娃背,只是背帶的部分要再加長一點  (背帶長度依醜娃衣服厚度調整
比例大概是這樣(背帶太短只好讓鶯丸拿著
哦哦哦 
真的好可愛
謝謝教學
真的好可愛
謝謝教學